Tag: sao paulo

Babka Recipe / Receita

Babka de chocolate

Queria muito poder dizer que esse pão amanteigado, fofinho com muito chocolate é pra mim uma memória de infância, mas só provei babka pela primeira vez depois de adulto e “barbado”.

No período que morei em NYC passei um bom tempo em um bairro predominantemente judeu e foi em uma bakery bem tradicional que conheci essa maravilha.

Quando comecei me aventurar na cozinha ousei comentar com o padeiro que queria aprender fazer a famosa babka. Foi um balde de água fria. Lembro dele me dizendo que não era para iniciantes e que era segredo de família. Anos depois resolvi tentar e percebi que fui trolado.

Admito que ainda não consegui reproduzir o gostinho daquela babka, mas essa versão é deliciosa, fácil e não é segredo de família.

Ingredientes (faz 2 unidades – forma de pão 20 x 10 x 6 cm) : 530g farinha, 100g açúcar demerara, 10g colheres de chá de fermento biológico seco, 1/2 colher de chá sal, 130ml água filtrada, 3 ovos, 150g manteiga, Raspas de 1/2 limão siciliano

Recheio: 120g chocolate meio amargo de boa qualidade, 130g manteiga, 50g açúcar confeiteiro, 30g cacau em pó

Cobertura: 20ml de água, 56g açúcar demerara ou cristal

Modo de preparo:

Massa: Na tigela da batedeira combine farinha, açúcar e fermento, raspas de limão, e  por último coloque o sal.

Adicione a  água e os ovos e usando o gancho de massas bata na velocidade baixa até formar uma massa pesada e desgrenhada.

Adicione a manteiga aos poucos e aumente a velocidade para média até que toda manteiga seja incorporada. Bata por cerca de 5-8 minutos até que a massa fique mais elástica e comece desgrudar das bordas da tigela. Se necessário adicione algumas colheres de chá de farinha para conseguir o resultado (uma colher por vez)

O resultado será uma massa aveludado e macia.

Unte uma tigela com tampa e deixe a massa descansar na geladeira por 8 horas ou de um dia para o outro.

Recheio: Derreta o chocolate e a manteiga em banho maria. Acrescente o açúcar de confeiteiro e cacau e mexa com uma espátula até formar uma pasta.

Cobertura: Leve açúcar e água ao fogo médio até que o açúcar derreta.

Montagem: Retire a massa da geladeira e separe em 2 partes. Abra em formato retangular com medidas aproximadas de 25cm x 30cm e usando uma espátula espalhe o recheio (lembre-se de dividir o recheio para as 2 babkas) deixando cerca de 1 cm de borda. Vai fazer uma bagunça, mas é a parte mais divertida.

Enrole, no sentido do comprimento, apertando bem e sele o final pincelando um pouco de água para ajudar fechar.

Coloque no freezer enquanto prepara a segunda babka.

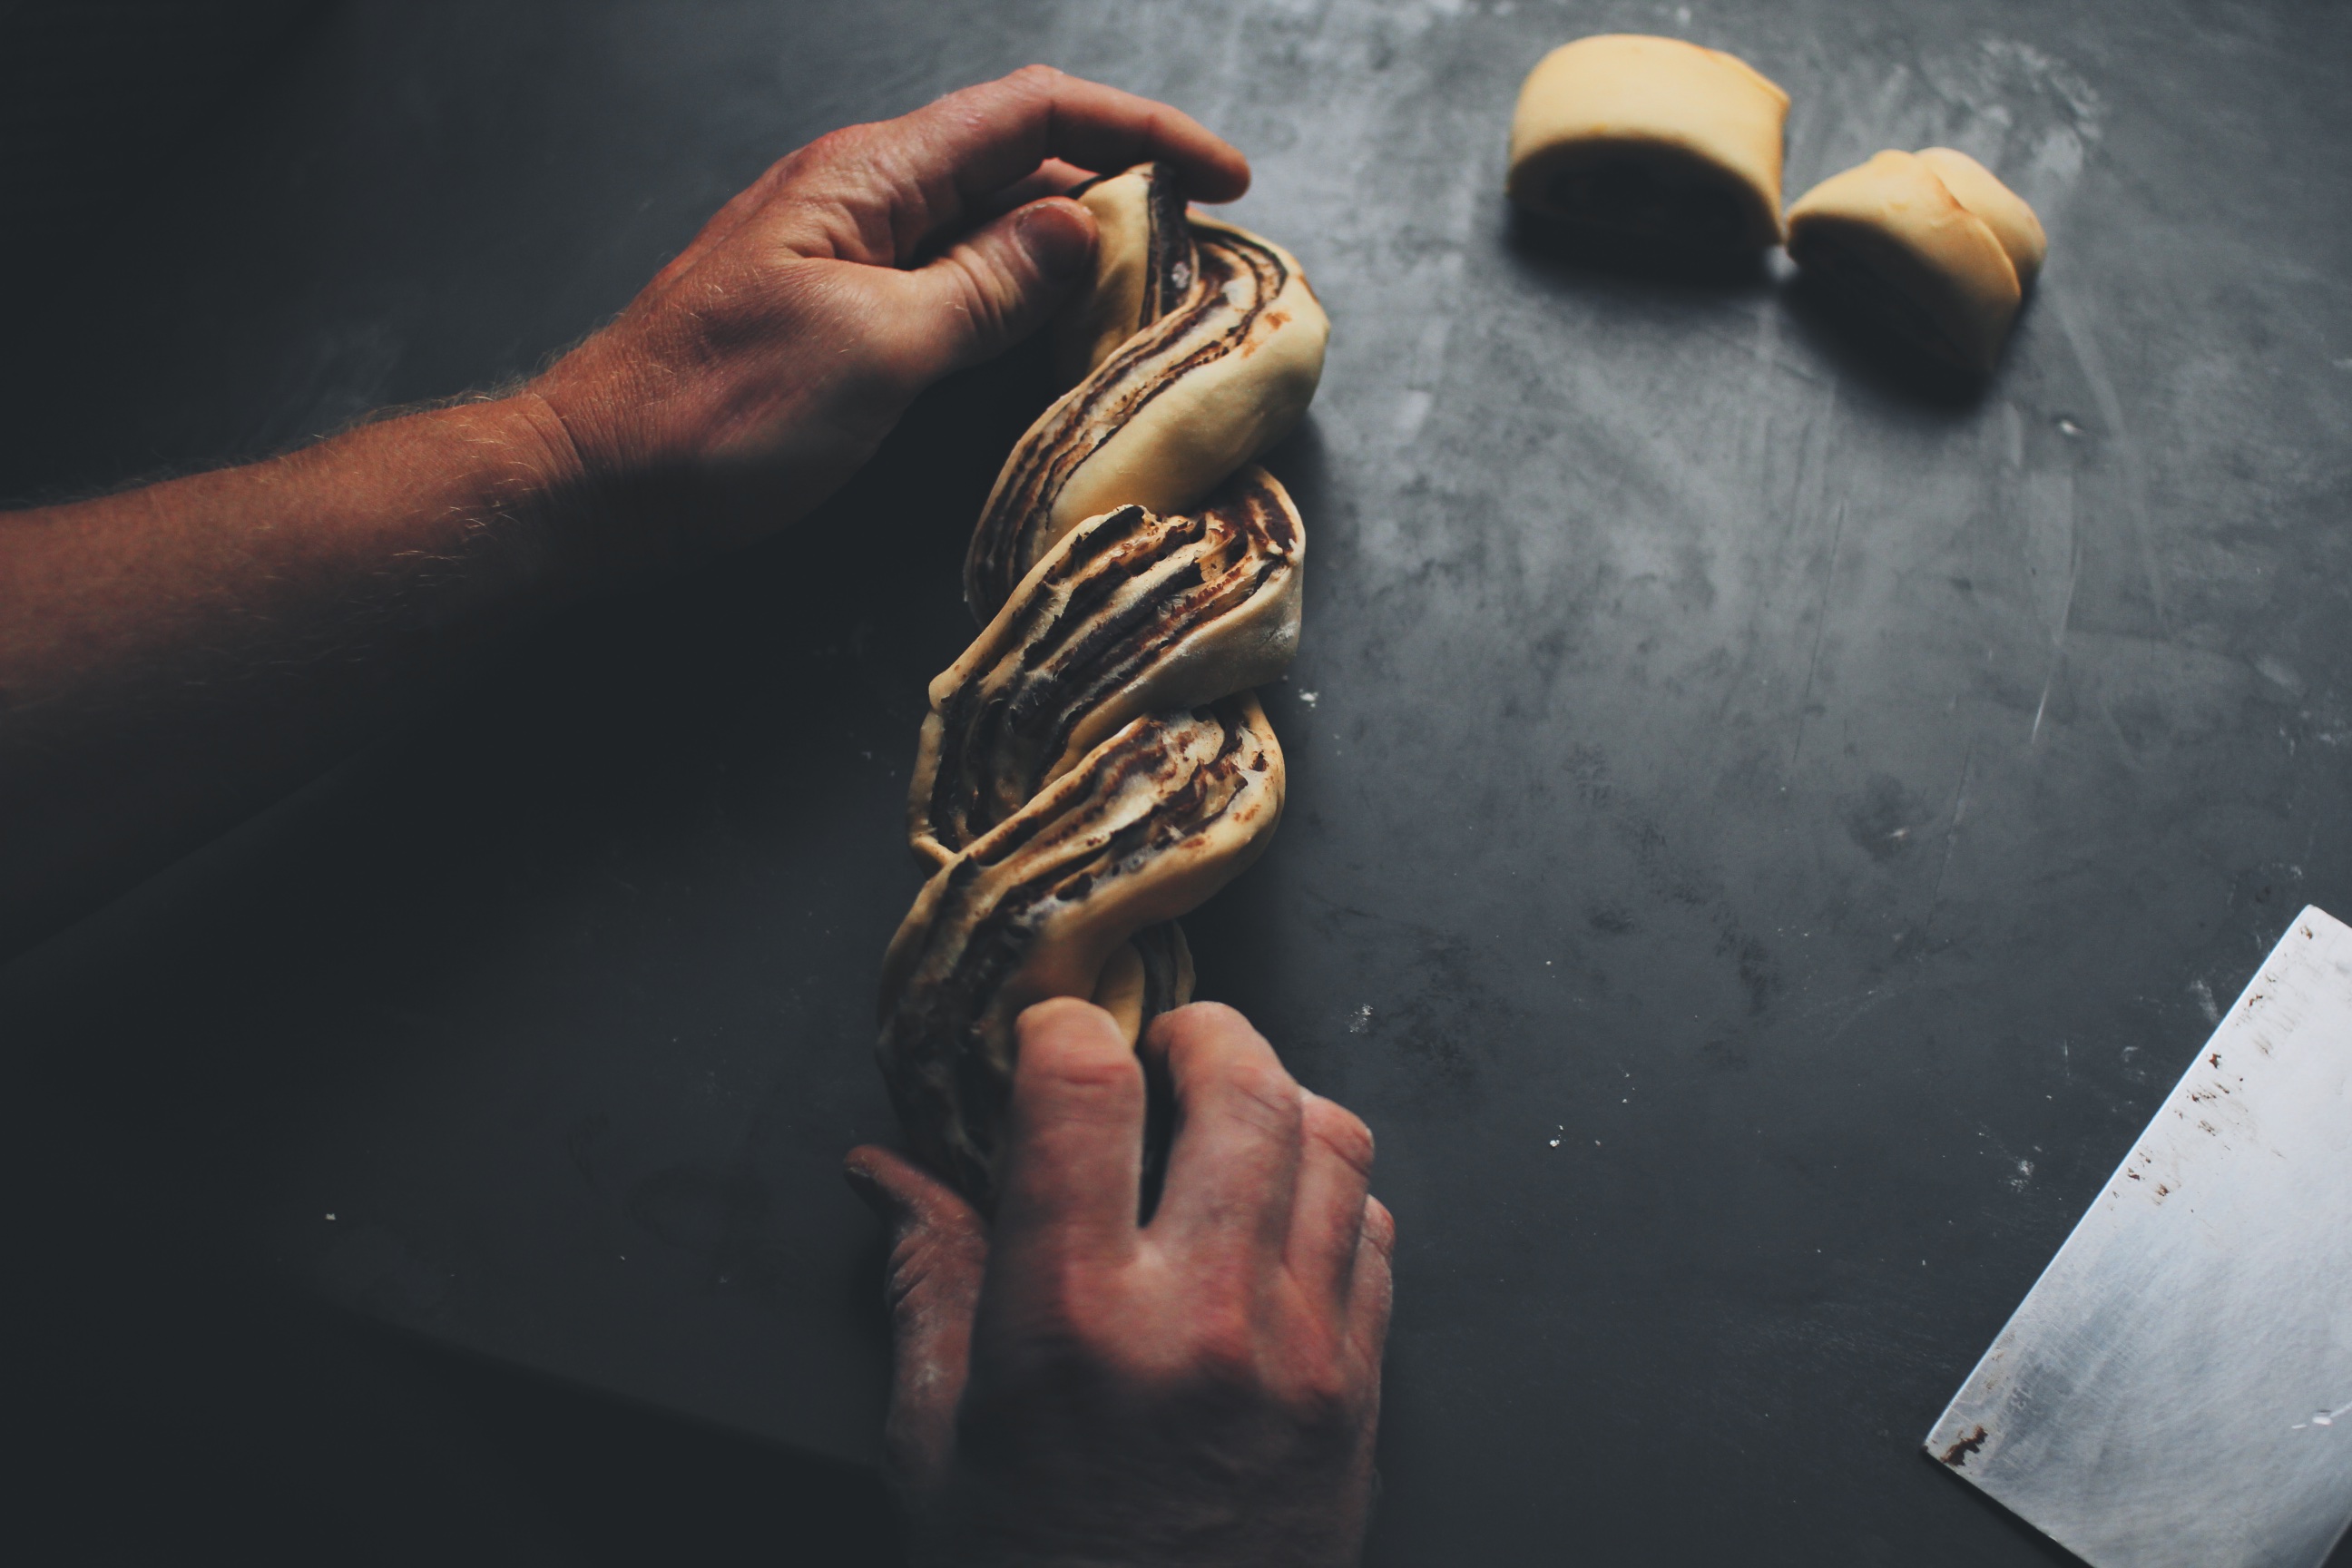
Retire o rolo do freezer, corte cerca de 1cm no final de cada ponta e com uma faca bem afiada corte o rolo ao meio no sentido do comprimento. Com as camadas de chocolate para cima, trance as 2 metades. Esse processo é para dar efeito visual, mas você pode finalizar como preferir.

Coloque a massa trançada na forma untada e pode colocar as pontas que foram cortadas nos espaços vazios.

Cubra e deixe descansar na forma por cerca de 1-1h30.

Asse as babkas por 20 minutos na temperatura de 190C até ficarem douradas e ao inserir um palito o mesmo saia limpo.

Retire do forno e pincele com a calda de açúcar.  Deixe esfriar 10 minutos e desenforme.

É difícil resistir, mas deixe esfriar completamente antes de servir.


Passe um café para acompanhar e aproveite.

Sourdough / Pain au Levain

I had never experienced Sourdough bread until I moved to New York City in 2009. I remember it clearly, my first few months there, I was on the tourism trail, ticking off as many of the highlights as I could. At that point, I just had been assigned to a project for just one year, so I had to do the things that others tell us we must do.

One of them was, of course, Katz Diner in the Lower East Side. Famously, Sally, from When Harry met Sally, climaxed at the table over a pastrami on rye sandwich. Since then, the Diner has been selling sandwiches by the bucket load, but coming up short on the climaxes.

harrysally

But damn, it was a good sandwich, and the bread struck a chord with me. I would buy sourdough bread from a small Jewish bakery on the Upper West Side, later on from the bakery just off of Bedford Ave in Williamsburg. It was cheap, delicious and it’d see me the week.

When I couldn’t get the bread fresh, I discovered Bread Alone, a small outfit of Artesenal bakers in upstate New York. They’d bake fresh bread and deliver it to some of the Cities stores and Supermarkets daily. I tried all of their style, but always found myself going back to the Sourdough. The tang, the chewy crust, the aerated pockets all the way through the loaf. I never really thought much about the process, however. I was ignorant to the skill and time that goes into baking these breads.

When I left NYC to move to São Paulo, I discovered these amazing bakeries, that sold everything. You could get the normal things you’d expect from a bakery, plus your beers, groceries and even dinner.

Unfortunately, I don’t think Brazilians take their bread very seriously. I found myself just buying the same crappy bread again and again, Pão Frances. It’s a small baguette style roll, made with commercial yeast, cheap flour and baked by the thousand, all over Brazil every day. It’s cheap, it’s sort of tasty but it lacks in everything else. The bread is salty and light, it doesn’t satisfy much of anything at all, but just leaves you wanting more, and that’s not necessarily a good thing.

Once Tati and I moved to the farm, 18 months ago, we found ourselves without the luxury of a bakery, or market, or anything in fact, close by. Everything required getting in the car and driving some KM’s to stock up. We started growing things and eating what was on the trees here, and we started shopping once a week and planning ahead a lot more.

We also started to bake our own bread. Firstly, basic recipes with commercial yeast, then we moved onto wholegrain breads, but still using commercially manufactured yeast. It wasn’t until I sat down with a small book and read about sourdough, the natural levain, and the processes one needs to go through to make their own. It seemed confusing at first, like catering for a tamagotchi of yesteryear, but I slowly found a rhythm and after a couple of attempts and a couple of weeks, I had a vibrant, tangy smelly, active starter.

The Starter

To begin with, I baked a fail safe sourdough recipe, that also called for a pinch of commercial yeast, to kick start things right away, but as I started to get regularly decent results with that, I took the plunge in using just my yeast, water and flour, to make our own bread.

There were disasters, there were paper weights, solid bricks of baked flour, there were swear words, there were cut fingers and there was confusion. A lot of confusion.

It’s a living thing, this yeast, it gets pissed off if its too hot, too cold, not fed enough, (although, it’s quite happy to be over fed) and the dough will overproof if left too long during bulk ferment or the final proofing. It can seem erratic, but once you start doing it more often, there are patterns and you begin to understand this things behavior, and its beautifully simple really. Unlike a tamagotchi. The fuckers.

Now I have 4 recipes, a plain white sourdough, a rye sourdough, a multigrain sourdough, and a wholewheat sourdough. It doesn’t tick all the boxes, but it gets close. I want to eventually play with dried fruits, nuts, olives and things like that. I want to make a special batch of fig bread, with the figs from our trees here, but that’s one for next fig season though!

There are many journaled reasons as to why Sourdough is a better health choice to make when choosing bread. For me, it is easier on the gut, and it tastes fantastic, plus I enjoy the process. But, there are many reasons why even those with an intolerance to gluten, can enjoy bread. The long fermentation process (totalling 12 hours for my batches, but others ferment up to 36)  breaks down a lot of the slightly less gut-friendly starches in the bread. This gives the bread a lower glycemic index, meaning we see a slower release of the foods contained energy and reduces the risk of blood sugar spikes. The long fermentation process also breaks down the complex gluten structures in the bread, turning them, instead, into amino acids that our bodies are more receptive too, and also, far easier to digest. Additionally, this long fermentation creates an increase in the lactic acid, thus maintaining a pH that is neither too acidic nor alkaline for the body. 

All in all, it’s just something that our bodies can process a lot easier than commercially created bread, explicitly due to the long fermentation process. Not to mention it tastes good, and can last up to a week. The acetic acid which is produced along with lactic acid helps to preserve the bread, inhibiting mold growth.

For us, it’s good for sandwiches for up to 3 days, toast up to 5 days and after that it makes banging french toast, or bread crumbs for other recipes. Nothing is wasted.